自动转义是将变量的一些特殊字符,比如左箭头(<)、右箭头(>)转义成html代码,这样做的目的是为了处理一些不安全的变量。
<=========<
>=========>
'========='
"========="
&=========&
2.自定义过滤器
DTL模板语言生来只是为了方便的展示信息,所以与编程语言相比显得有点薄弱,有时候不能满足我们的需求。因此django提供了一个接口,让开发者能自定义标签和过滤器。
自定义过滤器必须处在已经安装了的app中的一个名叫”templatetags”的包(文件夹)中。因此可以有两种选择:
    1、一种是放在其他已经安装了的app中。这种方式简单,但不方便管理。
    2、单独创建一个app,用来存放所有的自己定义的过滤器。
注意事项:
    1、创建完templatetags模块后,你需要重启服务器。
    2、在模板中加载的是过滤器所在的文件名,而不是app的名称。
register.filter:参数详解
Name 过滤器名
Is_safe 保证不引入不存在的不安全的html符号
needs_autoescape 决策是否采用自动转义
初始化
#/common/views.py
# -*- coding: utf-8 -*-
from __future__ import unicode_literals
from django.shortcuts import render
def book(request,bn):
    return render(request,'hello_books.html',{'books_name':bn})
#/day07/urls.py
from django.conf.urls import url
from django.contrib import admin
from common import views
urlpatterns = [
    url(r'^admin/', admin.site.urls),
    url(r'^books/([\S\s]+)', views.book),
]
使用方法
1.单独创建common应用存放自定义过滤器,在下面新建templatetags文件夹,并增加一个文件customer_filter.py
1.1通过函数注册
register.filter('mycut',mycut)
前一个mycut对应前台的过滤器名称,后一个mycut是自定义函数名.
#common/templatetags/customer_filter.py
#coding:utf-8
from django import template #需导入django系统的模板
from django.template.defaultfilters import stringfilter
register=template.Library() #创建一个注册器
def mycut(value,arg): #定义一个mycut函数,将传入的字符串value,将arg替换成为空''
return value.replace(arg,"")
register.filter('mycut',mycut) #用注册器对自定义函数进行注册
在网页模板,务必使用{% load custom_filter %}命令,加载我们自定义的函数.否则,会报错无效的过滤器
#hello_books.html
{% load custom_filter %}
<html lang="en">
<head>
    <meta charset="UTF-8">
    <title>dtl3</title>
</head>
<body>
    {{ books_name|mycut:"_"}}
</body>
</html>
视图函数只需要传入一个变量bn给前台模板即可.
#views.py
# -*- coding: utf-8 -*-
from __future__ import unicode_literals
from django.shortcuts import render
def book(request,bn):
return render(request,'hello_books.html',{'books_name':bn})
1.2通过装饰器注册
如果使用装饰器,也可以有同样的效果
#coding:utf-8
from django import template
from django.template.defaultfilters import stringfilter
register=template.Library() #创建一个注册器
.filter #使用装饰器,也有同样的效果
def mycut(value,arg):
return value.replace(arg,"")
1.3filter的参数
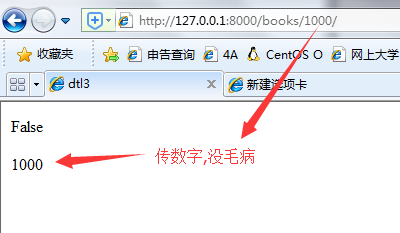
定义函数exists,该函数显示的功能是对url中传入的地址和模板进行判断,如果src在dst里面则返回True给前台,否则返回False
-
注意: 定义的函数名称是exists,注册时使用的参数是Exists,模板调用只能使用Exists
#common/templatetags/customer_filter.py
.filter(name="Exists")
def exists(src, dst):
return True if src in dst else False
模板中引用.
#hello_books.html
{% load custom_filter %}
{{books_name|Exists:'python'}}
2.简单标签
简单标签:
使用 Library.simple_tag注册;
命名参数takes_context=True时,可以使用context;
当使用take_context=True时,函数的第一个参数必需为context
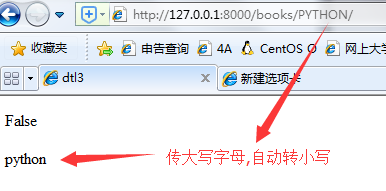
stringfilter过滤器
-
这里使用stringfilter有个效果,将地址中传入的数字转成字符串,提高程序的健壮性.
#common/templatetags/customer_filter.py
.filter
def mylower(value): #该函数的作用是将传入的大写字母转成小写
return value.lower()
#hello_books.html
{% load custom_filter %}
<body>
{{ books_name|mylower }}
</body>
3.内涵标签
使用Library.inclusion_tag注册
这种类型的标签可以被;其他模板进行渲染,然后将渲染结果输出
支持take_context=True
-
3.1首先给定义一个show函数,里面是一个列表返回一次context字典.
#common/templatetags/customer_filter.py
.inclusion_tag('result.html') #需要使用inclusion_tag注册result.html的模板
def show():
lis=[u'浮生',u'小祖宗',u'杨帆']
return {'choices':lis}
-
3.2 result.html模板,上下文是传到该页面上的.
#result.html
<!DOCTYPE html>
<html lang="en">
<head>
    <meta charset="UTF-8">
    <title>result</title>
</head>
<body>
    {% for i in choices %}
    <li>{{ i }}</li>
    {% endfor %}
</body>
</html>
-
3.3事实上
{% show %}是从其他模板result.html进行渲染,然后将渲染结果输出到hello_books.html
#hello_books.html
{% load custom_filter %}
<html lang="en">
<head>
<meta charset="UTF-8">
<title>dtl3</title>
</head>
<body>
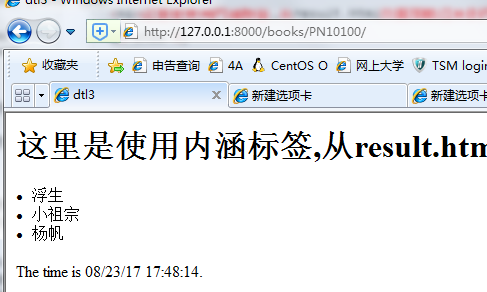
<h1>这里是使用内涵标签,从result.html页面加载过来的内容</h1>
{% show %}
</body>
</html>

4.分配标签
使用Library.assignment_tag
类似于简单标签,但并不会输出结果,可以使用 as 关键字将结果赋给一个参数
4.1准备好views,py传入一个 参数{‘timezone’:’%Z’} 给模板,用户格式化时间
#views.py
# -*- coding: utf-8 -*-
from __future__ import unicode_literals
from django.shortcuts import render
def book(request,bn):
    return render(request,'hello_books.html',{'books_name':bn,'timezone':'%Z'})
4.2将current_time ‘%c’ 使用别名ct替换
#hello_books.html
{% load custom_filter %}
<html lang="en">
<head>
    <meta charset="UTF-8">
    <title>dtl3</title>
</head>
<body>
<h1>这里是使用内涵标签,从result.html页面加载过来的内容</h1>
{% show %}
{%current_time '%c' as ct%}         #将current_time '%c' 使用别名ct替换
<p>The time is {{ct}}.</p>
</body>
</html>
4.3 customer_filter.py则使用Library.assignment_tag分配标签
-
定义一个current_time函数,对传入的上下文context,按照format_string格式进行处理
#common/templatetags/customer_filter.py
.assignment_tag(takes_context=True)
def current_time(context,format_string):
timezone=context['timezone']
return time.strftime(format_string,time.localtime())
运行效果
Template配置
1. BACKEND:配置选择那个模板引擎。
2. DIRS:配置模板引擎搜索模板路径。
3. APP_DIRS:是否查找已经安装了的app下的templates文件夹下的模板文件。
4. OPTIONS:可选的配置,有以下key进行配置:
   (1) autoescape:是否打开HTML的自动转义,默认是打开的。
   (2) context_processors:上下文处理器。
   (3) libraries:添加第三方模板标签,如果使用需要使用{%load%}进行导入。
   (4) builtins:添加模板标签到,不需要使用{%load%}进行导入,直接当成内置的使用。
   (5) file_charset:模板编码方式。
- django查找Template的顺序
django安装INSTALLED_APPS中的添加顺序查找Template文件
不同APP下Template目录中的同名html文件会发生冲突
def hello_books(request, bn):
    if bn = 'index':
        #books/templates/books/index.html
        return render(request, 'books/index.html')
    else:
        return render(request, 'hello_books.html', {'books_name' : bn})
def hello_movies(request, bn):
    if bn = 'index':
        #movies/templates/movies/index.html
        return render(request, 'movies/index.html')
    else:
        return render(request, 'hello_books.html', {'books_name' : bn})


最新评论