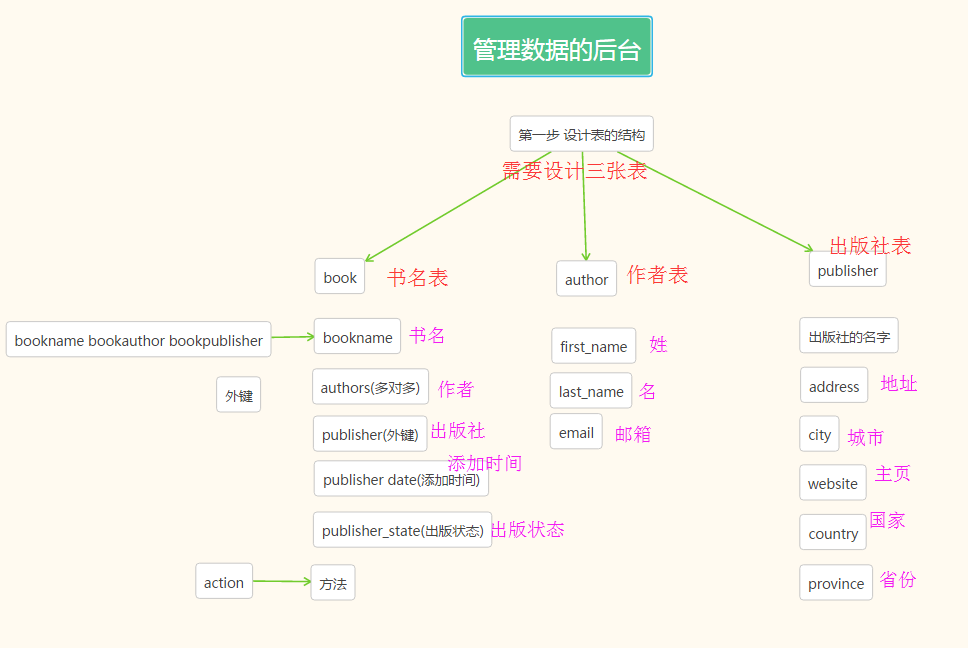
1.表关联操作
1.1在models.py下映射出3张表到数据库
from __future__ import unicode_literals
from django.db import models
class Publisher(models.Model):
name = models.CharField(max_length=30)
address = models.CharField(max_length=50)
def __unicode__(self):
return self.name
class Author(models.Model):
name = models.CharField(max_length=30)
age = models.IntegerField()
email = models.EmailField()
def __unicode__(self):
return self.name
class Book(models.Model):
title = models.CharField(max_length=100)
authors = models.ManyToManyField(Author)
publisher = models.ForeignKey(Publisher)
def __unicode__(self):
return self.title
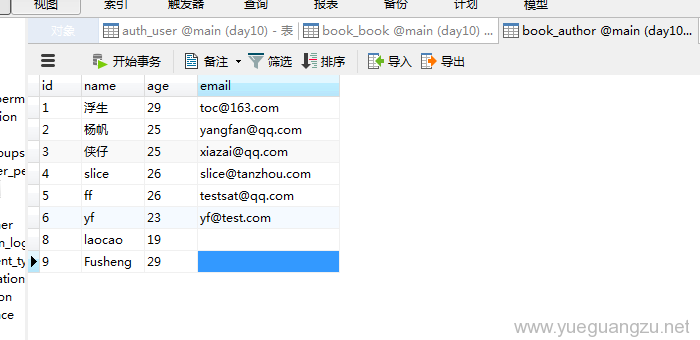
id name age email
1 浮生 29 toc@163.com
2 杨帆 25 yangfan@qq.com
3 侠仔 25 xiazai@qq.com
4 slice 26 slice@tanzhou.com
5 ff 26 testsat@qq.com
6 yf 23 yf@test.com
id title publihser_id
1 论一夫多妻 2
2 从删库到跑路 1
3 FUCK 2
4 more and more 2
5 django 4
id name address
1 人民教育出版社 北京市解放西路
2 不可描述出版社 火星非主流市
3 ffd ffffffffd
1.2现在需要往数据库添加一条book记录,shell模式下操作
>>>python mange.py shell
>>>from book.models import Author,Book,Publisher
>>> a=Author(name='laocao',age=19)
>>> a.save()
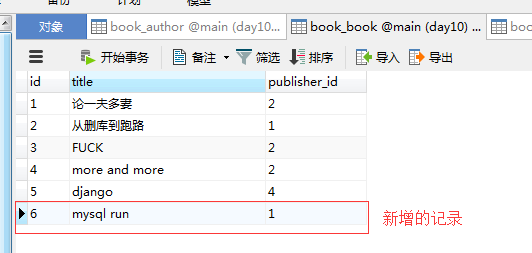
>>> b=Book(title='mysql run',publisher_id=1)
>>> b.save()
>>> b.authors.add(a)
>>> b.save()
-
需要注意的是,使用此方法进行插入数据,需要用a.save() 事先对外键的记录进行入库.
-
书籍增加的时候,也需要b.save()先入库,才能操作多对多关联b.authors.add(a) 操作,否则会报错.
1.3多对多查询
>>> Author.objects.filter(name='laocao')[0].book_set.all()
<QuerySet [<Book: mysql run>]>
----------------------------------------------------------------------
>>> Author.objects.filter(name='laocao')[0].book_set.all()[0]
<Book: mysql run>
>>> Author.objects.filter(name='laocao')[0].book_set.all().first()
<Book: mysql run>
>>> Author.objects.filter(name='laocao')[0].book_set.all().last()
<Book: mysql run>
1.4外键的级联删除
-
首先需要修改models.py文件,将上面的authors字段从多对多models.ManyToManyField(Author)修改为一对一authors = models.OneToOneField(Author,null=True,on_delete=models.CASCADE)
-
on_delete=models.CASCADE该字段参数表名使用级联删除
-
Do not Foget to python manage.py makemigrations & python manage.py migrate
class Book(models.Model):
title = models.CharField(max_length=100)
authors = models.OneToOneField(Author,null=True,on_delete=models.CASCADE)
publisher = models.ForeignKey(Publisher)
def __unicode__(self):
return self.title
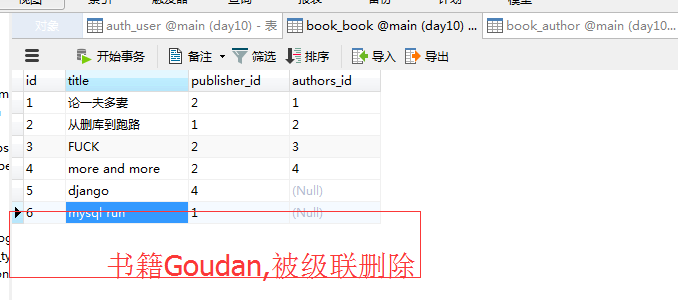
首先增加一个作者Fusheng (shell模式下操作)
>>> a=Author(name='Fusheng',age=29)
>>> a.save()
可以看到新增的作者Fusheng的id=9,新增一本书Goudan
>>> b=Book(title='Goudan',publisher_id=1)
>>> b.save()
>>> b.authors_id=9
>>> b.save()

现在删除作者Fusheng的记录
>>> Author.objects.get(name='Fusheng').delete()
>>>(2, {u'book.Book': 1, u'book.Author': 1})
-
可以看到,因为authors字段存在级联删除,所以当作者Fusheng被删除了,书籍Goudan也被级联删除
2.自定义field
Django常用的Field已经足够日常使用,如果内置Field无法满足需求,可以自定义Filed
实质是通过对内置的Filed类进行继承和派生
2.1自定义一个类ListField,该类是从TextField派生,定义了3个方法,实现的作用是
to_python 函数用于转化数据库中的字符到 Python的变量
get_prep_value 用于将Python变量处理后保存到数据库,
value_to_string 用于print
from django.db import models
import ast
class ListField(models.TextField):
description = "Stores a python list"
def __init__(self, *args, **kwargs):
super(ListField, self).__init__(*args, **kwargs)
def to_python(self, value):
if not value:
value = []
if isinstance(value, list):
return value
return ast.literal_eval(value)
def get_prep_value(self, value):
if value is None:
return value
return unicode(value)
def value_to_string(self, obj):
value = self._get_val_from_obj(obj)
return self.get_db_prep_value(value)
2.2改动models.py,首先需要导入from book.ListField import ListField在Author类下增加字段area,使用自定义的类ListField
-
别忘了 python manage.py makemigrations & python manage.py migrate
from __future__ import unicode_literals
from django.db import models
from book.ListField import ListField
class Publisher(models.Model):
name = models.CharField(max_length=30)
address = models.CharField(max_length=50)
def __unicode__(self):
return self.name
class Author(models.Model):
name = models.CharField(max_length=30)
age = models.IntegerField()
email = models.EmailField()
area = ListField(null=True)
def __unicode__(self):
return self.name
class Book(models.Model):
title = models.CharField(max_length=100)
authors = models.OneToOneField(Author,null=True,on_delete=models.CASCADE)
publisher = models.ForeignKey(Publisher)
def __unicode__(self):
return self.title
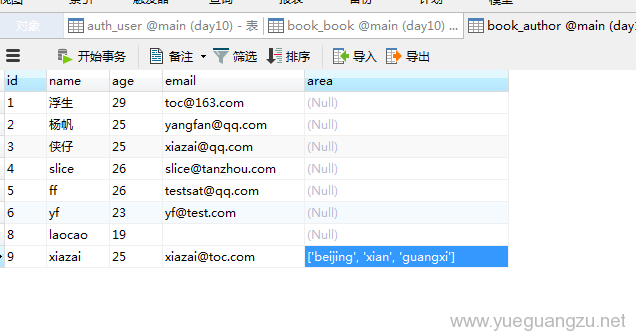
2.3 在shell模式下增加一个作者xiazai的记录,使用自定义Field
F:\Project\git\web\day10>python manage.py shell
Python 2.7.13 (v2.7.13:a06454b1afa1, Dec 17 2016, 20:42:59) [MSC v.1500 32 bit (Intel)] on win32
Type "help", "copyright", "credits" or "license" for more information.
(InteractiveConsole)
>>> from book.models import Author
>>> a=Author(name='xiazai',age=25,email='xiazai@toc.com')
>>> a.area=['beijing','xian','guangxi']
>>> a.save()
3.自定义sql
3.1 Manager.raw() :执行原始查询并返回模型实例,格式是Author.objects.raw(sql),返回的是一个RawQuerySet对象.
shell模式下
>>> Author.objects.raw('select * from book_author')
<RawQuerySet: select * from book_author>
>>> b=Author.objects.raw('select * from book_author')
>>> b[0].name
u'\u6d6e\u751f'
>>> print b[0].name
浮生
>>> for i in b:
... print i.name
浮生
杨帆
侠仔
slice
ff
yf
laocao
xiazai
3.2 Executing custom SQL directly直接执行自定义SQL,这种方式可以完全避免数据模型,直接执行原始的SQL语句
django.db.connection:代表默认的数据库连接
django.db.transaction :代表默认数据库事务(transaction)
用database connection调用 connection.cursor() 得到一个游标(cursor)对象。
然后调用 cursor.execute(sql, [params]) 执行SQL
cursor.fetchone() 或者 cursor.fetchall(): 返回结果行
如果执行修改操作,则调用 transaction.commit_unless_managed()来保证你的更改提交到数据库。
该方式直接连接数据库执行sql操作,不经过数据模型.
>>> from django.db import connection,transaction
>>> cursor=connection.cursor()
>>> cursor.execute('select * from book_author')
<django.db.backends.sqlite3.base.SQLiteCursorWrapper object at 0x024EBA28>
>>> row=cursor.fetchall()
>>> row
[(1, u'\u6d6e\u751f', 29, u'toc@163.com', None), (2, u'\u6768\u5e06', 25, u'yangfan@qq.com', None), (3, u'\u4fa0\u4ed4', 25, u'xiazai@qq.com', None), (4, u'slice', 26, u'slic
e@tanzhou.com', None), (5, u'ff', 26, u'testsat@qq.com', None), (6, u'yf', 23, u'yf@test.com', None), (8, u'laocao', 19, u'', None), (9, u'xiazai', 25, u'xiazai@toc.com', u"[
'beijing', 'xian', 'guangxi']")]
>>> row[0]
(1, u'\u6d6e\u751f', 29, u'toc@163.com', None)
当然也可以传条件参数
>>> cursor.execute('select * from book_author where name=%s',['yf'])
<django.db.backends.sqlite3.base.SQLiteCursorWrapper object at 0x024EBA28>
>>> row=cursor.fetchone()
>>> row
(6, u'yf', 23, u'yf@test.com', None)
总结
本次内容涉及数据库核心操作,请务必学会!


最新评论